
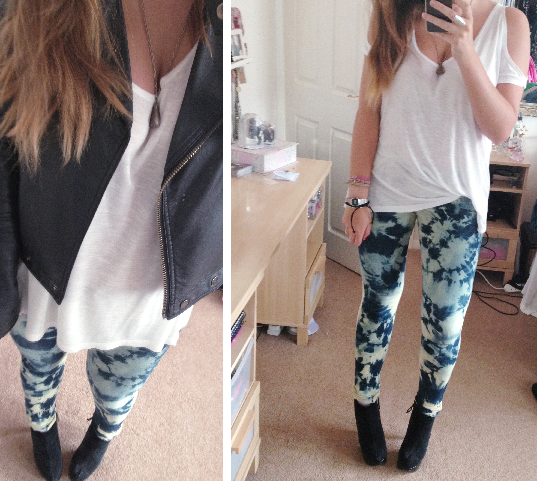
jacket: topshop, tunic top: new look, boots: topshop, jeans: DIY, necklace: vintage, watch: urban outfitters photograph (directly below): source unknown

i am sooooo so happy with how my old but now new jeans have turned out, i used a tie-dying bleach effect on them which is literally the easiest and simplest DIY i've ever done!
i've wanted to try it out ever since i saw isabel marant attack red jeans, denim shirts and pink chino trousers with some bleach in her S/S 2012 show. then this summer very similar pairs cropped up in zara ax paris and topshop, so i decided to give it a go on a really old pair of new look jeans (96% cotton, 4% polyester) and see how they turned out...
C L I C K 'R E A D M O R E' F O R F U L L T U T O R I A L . . .
D I Y I N S P I R A T I O N :


connected to fashion in her ax paris pair • and the lighter denim pair from zara • daniela + annette felder wearing their own jeans after their felder felder S/S 2010 show two years ago • rihanna spotted in an isabel marant bleached shirt • isabel marant herself wearing her S/S 2012 bleach jeans • three looks from the same isabel marant show
H O W I D I D I T :you will need: a bucket, five or six medium thickness elastic bands, thin household bleach, water - thats it!


1. so start off by putting your hand inside your jeans and randomly scrunching them up into your fist, then from the outside tightly tie an elastic around the bunch of denim with your free hand.
2. do this randomly all over the jeans until they are all tightly bunched, scrunched and twisted up. if there are any gaps or sections in the jeans missed out by the elastics - dont forget about the back! (so basically all the areas of denim you can see in your bunched up little ball of jean will be bleached a lot lighter, the areas hidden which are harder to get to - will remain dark)
3. take any looser loops of the elastic bands and stretch them over to catch and squish in the spare denim. do this if you want a pretty even and detail effect. otherwise! do the opposite only use one or two elastics to define a few unbleached areas.
4. now you need to fill a bucket with a bleach/water mixture, full enough so that the jeans are just submerged underneath. i used about a 1/3 bleach and 2/3 of water, make sure its all mixed thoroughly and the bleach isn't settling at the bottom - then dunk your jeans in.
5. the jeans will soak up the bleach/water mixture pretty quickly but dont refill or add more water, just allow the bleach to soak and strip away the colour. (100% cotton jeans will strip away the dye until they turn white, but if there is any polyester in the make-up of your jeans, the wont go pure white. they'll be stripped back to a very pale yellow colour)
6. check back on your jeans every half an hour or so, and turn them over if more colour has been stripped form the bottom. repeat every 30 mins until you are happy with the colour they have turned. i left my jeans in for about 2 hours - but be careful not to leave them long enough for the bleach to start burning holes!
7. take your jeans out and rinse them through with a shower to stop the bleach from working - until the water runs relatively clear, then remove the elastic bands.
8. finally, put them in the washing machine (alone!) with a tiny bit of bio powder on about a 40° cycle. then hang them out to dry! and you're done.
i've received a number of requests to make pairs for other people and i've gotten a few compliments on my own jeans so i hope this tutorial is easy to follow and has inspired or helped you out, if you were thinking of trying this technique for yourself!
soph x
Wow! I am super tempted to try this DIY out, it looks really easy and it's certainly effective. Your jeans look amazing!
ReplyDeletexxxx
They look great! Thanks for the tutorial :) xx
ReplyDeletelove the tutorial, the jeans look great definatley gonna have a go!!!Xxx
ReplyDeleteso amazing!!
ReplyDelete